enJOY it

an archived personal and craft blog from Elise Blaha Cripe.

  • IMG_5048
    IMG_5050
    IMG_4906

    a few favorites and links for the weekend :

    • American Apparel nail polish. I love the colors. So much that I bought blue and yellow even though I don't wear colors other than pink/red. Maybe this summer. Maybe the second I hop off the plane in CA. I have the gray on now and can say after one day – no chips. It goes on well and dries super quick. My favorite.
    • a new bag. For my birthday, Paul told me to pick out a j.crew bag. Shimmery and huge. My favorite.
    • yellow shoes. I think after April 24 yellow is going to give orange a run for it's favorite color money.
    • such a pretty flower bouquet.
    • love the gray walls.
    • such good blogging & business insight on marta writes this week.

    Have a happy weekend.

  • Update
    IMG_5036
    I will be adding what you see above (mixed books, letterpress cards and 5×7 paper packs) to the shop this afternoon. The paper packs are limited in number and came from some larger sheets I have around the house that have been used in small projects. Fun patterns for collage, minibooks or scrap pieces.

    I will also be reducing prices of some current shop goods.

    Gift IMG_5015
    All orders purchased today and tomorrow that are over $25 BEFORE shipping cost will receive three sets of colored labels in with their order. These are my favorite product ever and are like gold to me because they have been discontinued.

    GIVEAWAY 

    Over the course of my spring cleaning I have found some fun products that I no longer have use for. I have packed up a small priority box with a small photo album, labels, gift tags, rubber stamps, rub-ons & other fun stuff. I will ship it out to one randomly selected commenter. International readers, please feel free to join in, I just ask that you are willing to help pay for shipping if your name is drawn. Please leave a comment telling me your dream vacation spot.

    See you at 2pm!

  • Wedwed
    Open
    Set
    While I was home in Sacramento, I got our wedding invitations in the mail. It was a big relief to be able to check that off my list. These invites were multiple steps and turned out much different than I would have thought I would go with. Click the images to see the photos a bit clearer.

    IMG_4995
    The invitation itself is a 5×7 flat card. It has two sides and is actually two separate cards glued back to back. The striped side was made in PSE and then printed with a glossy sheen by vistaprint.com. The text side was printed on my home computer (I have an HP PhotoSmart 2575)
    on cream Arturo paper. The Arturo paper was about 8×6.5 inches and I trimmed it after printing which is how I got the image so close to the border of the card. I adhered the cards back to back with a memory tape runner and rounded the corners with a Fiskars squeeze punch.

    IMG_4456
    The RSVP card was printed two per sheet on a 5×7 gray card. I cut them in half using a paper cutter. I printed these at home as well and while the orange ink on gray cardstock could have looked better, they turned out fine.

    Rsvp2
    The RSVPs will be mailed back in 4bar electric orange envelopes from Paper Presentation. I added an Avery label to the envelopes so I didn’t have to print on them or write out the return address. My theory on labels is – if you are going to use them, make them part of the design. Clear labels are my paper pet peeve because it looks like you are trying to hid the fact that you used a label. Step up and admit it, just make them look fun. I added our little flower motif to the edge and folded them over the side so they were a bit more interesting.

    IMG_4993
    I added one small card which had our website information. I did not include a reception/details/accommodations card so it’s important that guests remember to look at the website. These cards were made by cutting our save the date cardstock in half. Simple and inexpensive.

    Envelopes
    The mailing envelopes were gray and lined with the same Snow & Graham paper as the save the dates. I stuck gray labels (from Paper Source but discontinued) on the front and addressed in orange pen. The king & queen postage stamps worked perfectly again.

    Overall, it was a lot of steps for pretty simple invitations. They are unique to us and fit with the feel of our wedding. I’m so glad they are already in the homes of our guests. I'm even more excited that we are already getting RSVPs back in the mail.

    PS : you can see our matching save the dates here.

  • Shopsale

    I've been cleaning for the past three days and have a pretty pile of stuff to add to the shop this week. Some mixed books, some found letterpress goods, plus some new paper packs out of the big sheets that won't be coming with us to San Diego.

    I will post photos, details on how to get a free gift with your order and a Spring Cleaning giveaway (with good stuff, I promise) on Thursday morning. The shop will be updated at 2 pm EST the same day.

  • IMG_4983
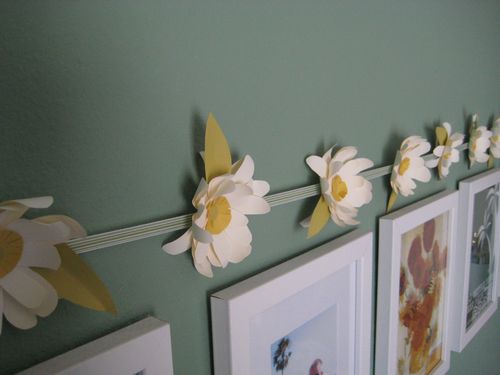
    I spent my shift at Paper Source last week making paper daisies for the spring window. This was my first time using the new kit, and I loved how they turned out. Eight hours of cutting, gluing and folding will really get you thinking and I started to dream up all sorts of ways that I could use flowers like these in my life.

    Unfortunately, most of the ways involve having children (preferably girls) and throwing birthday parties. Right now there is none of that on the agenda.

    Either way though, I figured some fun white flowers would bring spring to our current apartment and would eventually look nice in our new place. Especially if I stick to my plan of making it look like this.

    The tutorial below is inspired by this Paper Source kit (which is nice because the flowers are pre-punched, there are templates and it comes with wire/tape to make stems). My way is a bit more freehand so check your perfectionism at the toolbar.

    IMG_4959
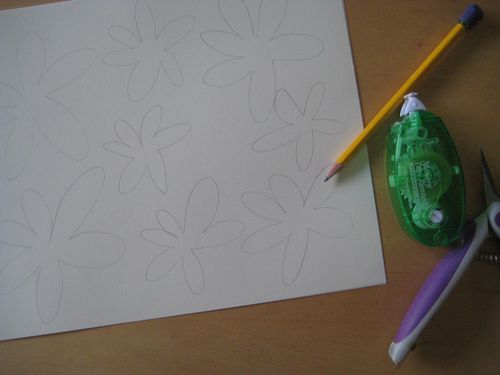
    You will need three colors of text weight paper, scissors, adhesive (I used a double sided tape runner) and a pencil. Lightly sketch flowers with at least five to six petals on a sheet of paper. For each competed flower you will use two "large" flowers and two "small" flowers. Go for about 5 inches and 3 inches.

    IMG_4962
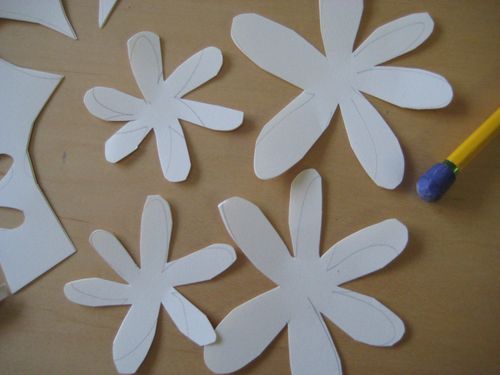
    Cut out your flowers and erase the pencil marks.

    IMG_4960
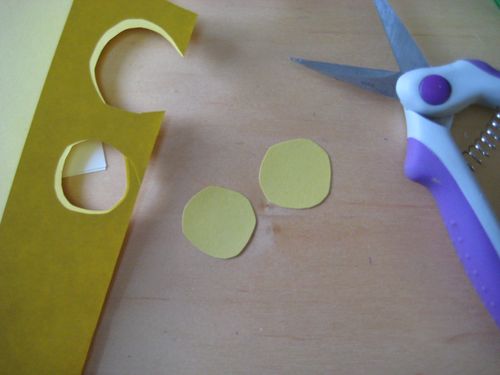
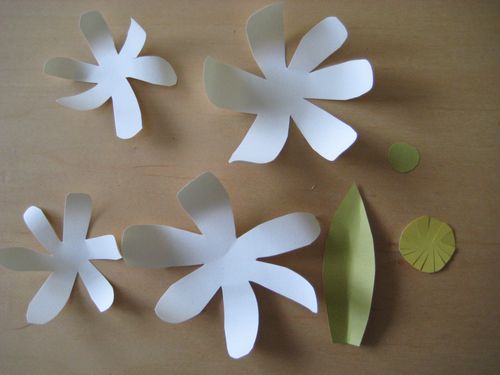
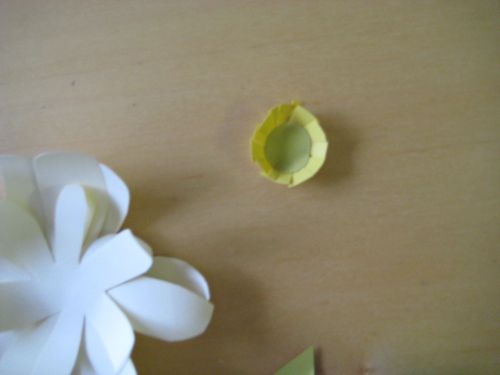
    Freehand cut circles from another color of paper. I folded the paper in half to get two circles at a time.

    IMG_4961
    IMG_4964
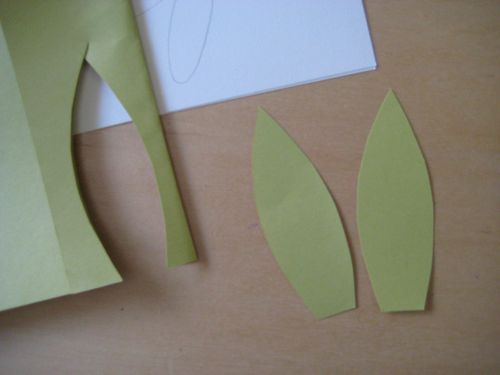
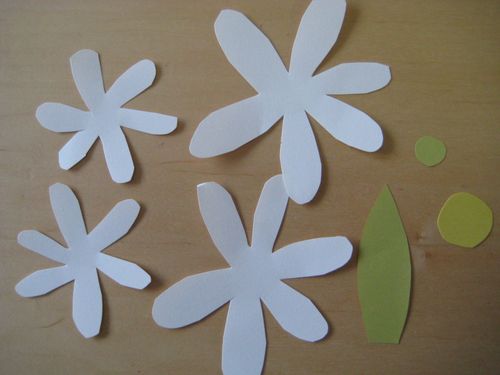
    Freehand cut leaves and a smaller circle as well. You will need the above pieces to create one flower.

    IMG_4967
    The difference between a flat paper project and a 3D paper project is in the folding. Use a pencil to curl up the petals on each of your flowers.

    IMG_4968
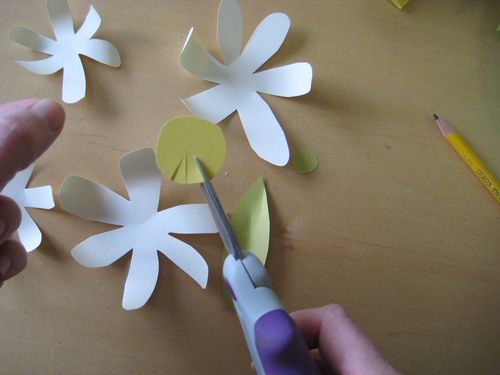
    Cut hashes all the way around your larger paper circle.

    IMG_4970
    Fold your paper leaf in half to give it more dimension.     

    IMG_4971
    IMG_4972
    IMG_4973
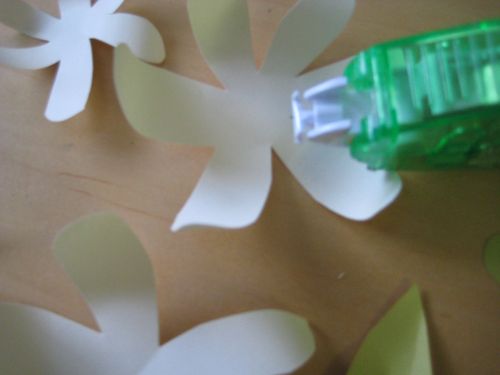
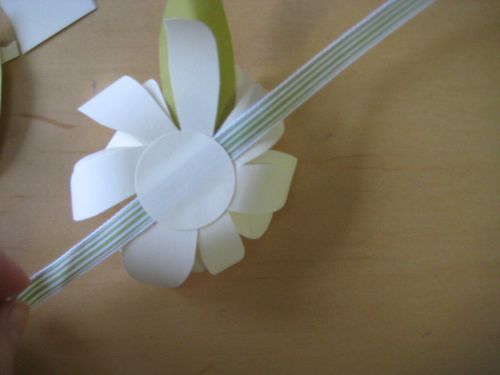
    To adhere, put a dot of glue or a piece of double sided tape into the center of each flower. You should have two large flowers below your two smaller flowers. Add your small circle on top of the cut circle and fold up the edges to make it more 3D. Add another dot of glue to the center of the petals and add your circle piece in the middle.

    IMG_4974
    Tuck your leave under the petals and TA-DA! You're done.

    IMG_4980
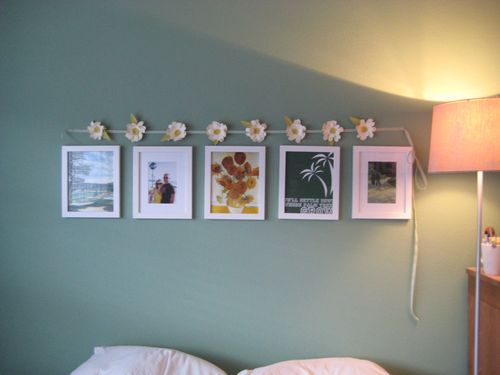
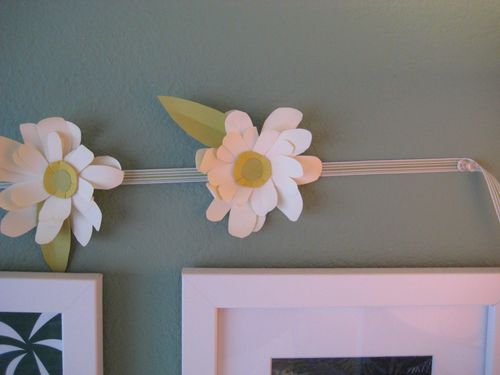
    I strung my flowers on a piece of ribbon and hung them over our bed. To make them stick to the ribbon, I added a small circle label to the back in the same color as the petals.

    IMG_4975
    If you were to hang them in a doorway or from the ceiling, I would make double the number of flowers and secure them back to back so from all angles they have a flower shape.

    Hope you enjoy!   

  • IMG_4985
    IMG_4986
    IMG_4988
    35 done, 145 to go.   

  • March
    We made it to March. This is great news. March is a verb. It's a call to action – A GET UP AND GO. I'm glad. I need that right now. 

    We are on the final stretch of our East Coast stint and unless a teleport machine that also goes through your stuff and eliminates junk gets invented, we have a lot to do. I have a list of lists to be made. (Not really, because there is no time for counter-productivity around here.) But I do have a plan to wake up when Paul does and add a few more hours to my day. (This means early; he starts his surgery rotation today.) There is a lot to accomplish for both the move and the wedding and while that's daunting, it's actually thrilling. We are moving home to start our new home.

    IMG_4979
    With everything going on, I still plan to be active with blogging this month. Projects, tutorials and giveaways. I might be making some sort of online garage sale blog. I have a few craft supplies and other goods that won't be moving west with us. But for now, look for a flower tutorial tomorrow and our wedding invites on Wednesday.

    IMG_4977
    So good times. March on. And be sure to check out the FREE blogging and business workshop on Marta's blog this week. 

  • Photo Photo2
    …the months that we spend together last as long as the months we spend apart.

  • IMG_4958 I got home from California and there was a tin of cupcake truffles from Southport Grocery in Chicago waiting in my mailbox. These are unlike anything I've had before and are now my most favorite candy. They actually taste like cupcakes. In bite-sized chocolate form. And they're too cute.

    Thanks Melanie. See you in April.

  • 25todo

    Another year, another list. I find it interesting how my list making criteria changes every year. When I turned 23 and made the first list, I didn’t put too much thought into it. I just came up with 23 things that I thought would better my life. When I turned 24, I knew that getting everything done was difficult so I went with what I thought were easier challenges. (As it turns out, some were not – I’ll show what I crossed off next week.)

    This year, I picked things that were not necessarily easy but most are possible to accomplish in one day. No long events or repetitive events. I have a big list of hard tasks (find a church), easy tasks (have a picnic), expensive tasks (buy bikes) & inexpensive tasks (play with chalk). So many of the 25 goals are things I want to do in our new town. I will be living in San Diego for nine months of this birthday year and that opens up many new opportunities.

    I have decided to document the progress on this list in a digital scrapbook.

    I am going digital for a few reasons. First, it’s different than last year and right now, changing things up sounds inspiring. Second, my 24 book is lacking in stories. It has plenty of ephemera, but no real words to help remember what I did and why. Third, I can type up the journaling in Microsoft Word (or on this blog) as I go. When I have the chance, I can copy and paste into Photoshop and add photos & design. I think this will make it easier to stay active in the documentation process. (Basically, I don’t want to do a year’s worth of catch up at the end.)

    I will be making 8.5×11 (or maybe 12×12? The square format sounds fun) pages in PSE, printing the completed pages and keeping together in an album. I will try to share progress as I go. (Hopefully much better than I did with the 24 list.)

    So here we go. To a new year. To a new list. To 25 exciting tasks.

    PS : Here is a look at the only other digital scrapbook I have made.