enJOY it

an archived personal and craft blog from Elise Blaha Cripe.

IMG_3569

Over the next few weeks I want to spend time on Tuesday talking about gift wrap ideas. Everything will be pretty simple but hopefully you'll get some fun ideas to make your packages more interesting. I am a big believer in the power of gift wrap. Real gift wrap. Complete with double sided tape & fabric ribbon.

There are a million ways to make presents look pretty on the outside. One thing I always do is tie the bow so the back is flat. The ribbon underneath looks as neat and clean as the tied bow on top. Below are my instructions for how to tie a bow using this method. Click images to enlarge.

Giftwrap1

To start, give yourself a long length of ribbon. Lay it underneath your wrapped box so that the side on the right has a much longer length of ribbon. The longer side should be about 3-4 times the length of the shorter side.

Pick up both sides of the ribbon and bring them to the front of the present and cross to opposite sides as shown in the above right image. The longer side should go "under" the shorter side when you make the crossover.

Giftwrap2

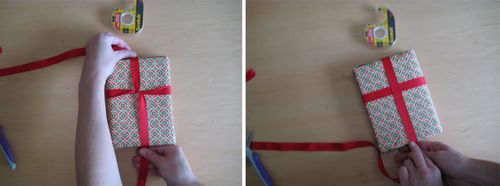
Create a cross in the ribbon by bringing one end down and the other up. Your longest length of ribbon should head to the top of the box.

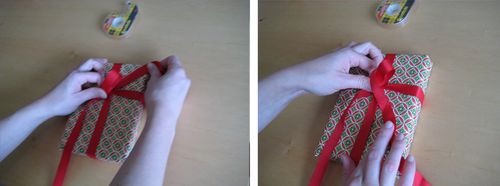
Holding the shorter ribbon side in place, wrap the long end around the back side of the box and bring it down to the bottom. You can see the back of the box in the right image above.

Giftwrap3

Turn the box back to the front and continue bringing the long side up to the center where you have made the first cross.

Tuck the long side to the right and pull it under the cross. If your ribbon was a compass, one end would be pointed Northeast and one end would be pointing Southwest. 

Giftwrap4

Take the Southwest side in your left hand and make a fold (like the first bunny ear if you were tying your shoe). Fold it so it also points to the Northeast like the other end of ribbon.

Bring the Northeast end around the folded side counter clockwise.

Giftwrap5

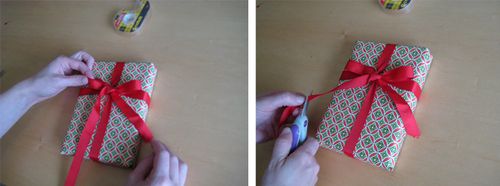
Push the end in your right hand under the first "bunny ear" and pull it tight. Give it a little bit of shaping until you have a neat bow with its two ears on the top side and its two tails neatly below

Trim off any excess ribbon.

IMG_3570 IMG_3571

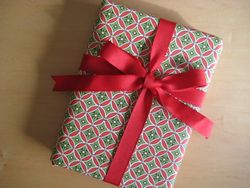
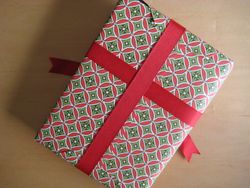
And TA-DA : You have a pretty package with a perfect bow on top and perfect ribbon underneath. Be sure to ask questions in the comments. This is a difficult technique to explain (even in person) but not too hard to master.

Posted in ,

17 responses to “tuesday how to : gift wrap bows.”

  1. lucy Avatar

    wow. brilliant! no more lumpy bumps on the back of presents : )

    Like

  2. sonya audrey Avatar

    this is really beautiful! Thanks for this. 🙂

    Like

  3. Katie Avatar

    Yes! Thank you! I have been needing this.

    Like

  4. Mandi Avatar

    I was sitting here forever trying to figure out why this bow was so special… haha And then I read the comment about the bumpy back, and it hit me. Very cool!

    Like

  5. Meg Avatar

    oh how i love pretty packages

    Like

  6. Cindy Avatar

    I come from a family where my mom set the wrapping trends and mainly used either curling ribbon (which I still love) or that paper ribbon that sticks a little if you get it wet (which I don’t love and never have). I am not really sure they even sell it any more. Anyway, I will never forget the year one of my older sisters was a poor high school student with no money to buy a big gift for each of us (family of 6 kids plus parents), so she made stockings and filled them with small things: bulk candy, a handmade ornament, etc. And for wrapping she used solid color paper (probably butcher paper and grocery bags) and REAL RIBBON (!) from the fabric store! It was awesome. They were like little jewels, those boxes. Thanks for triggering that memory. =]

    Like

  7. Laura Avatar

    I love the smooth back – why didn’t I know about this before? I will be trying this out for sure. I think (hope?) it will make more sense when I actually have ribbon in front of me.

    Like

  8. Maureen Avatar
    Maureen

    got to love a tutorial that includes “TA-DA”

    Like

  9. Julie Avatar
    Julie

    Awesome tutorial – it’s a keeper! I always crossed the ribbons in the back and things were crooked! Yuck! This is perfect!!!

    Like

  10. Iva Avatar

    What a beautiful package! I love Christmas perhaps mostly because of all the packaging! It’s like Disneyland to me, lol 🙂

    Like

  11. gifts Philippines Avatar

    Simply beautiful, you mean! This would make an awesome gift. 🙂
    zaijan

    Like

  12. philippines gift Avatar

    If are you making this as a gift its absolutely adorable so cute wrapper,i love this. Will certainly visit your site more often now.
    vee

    Like

  13. Cellophane Wrap Avatar

    Thanks for tutorial! I like that you make it step by step so it seem easy to do it.

    Like

  14. Sarah I Avatar
    Sarah I

    Thank you, I have been needing this because I need to wrap up a gift for my friend’s baby girl! ♥

    Like

  15. 70-680 Avatar

    Thanks for tutorial! I like that you make it step by step

    Like

  16. Cookie Baskets Avatar

    Thanks for sharing the gift wrap ideas. I am going to give the gift to my friend on his birthday, I hope this idea is going to help me.

    Like

Leave a comment