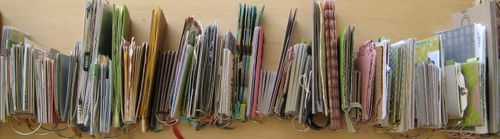
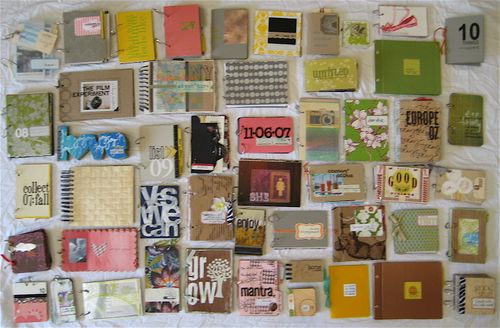
Little books are my favorite thing to make. They are concise. They can be made out of anything. They can stick with a theme. They can be clean and organized. They can be messy and fluid. Here is a list of many of them. You can also see more photos in my flickr.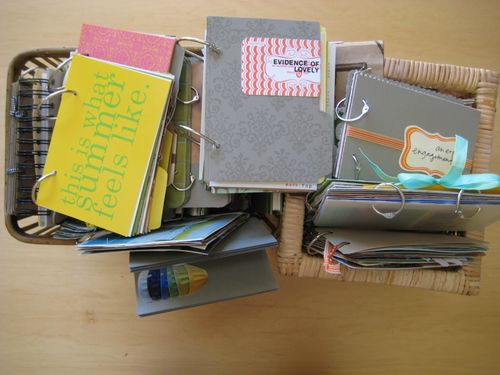
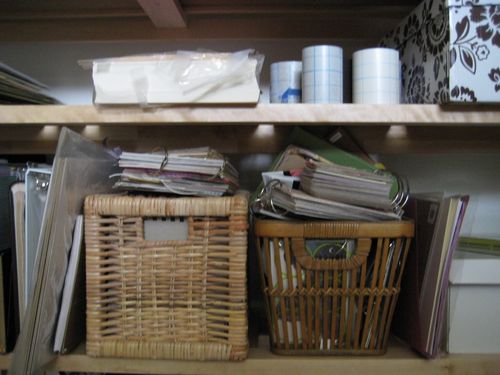 I store all 50+ of them in two baskets that sit under my desk. They are piled and squished into there. It's not the best plan, but it works. Someday when I have kids/a person who wants to look at them, I'll get them into some sort of better storage. Maybe a drawer or a larger basket. At the moment, no looks at them, not even me. Which is weird? Maybe? I don't know. At least they exist.
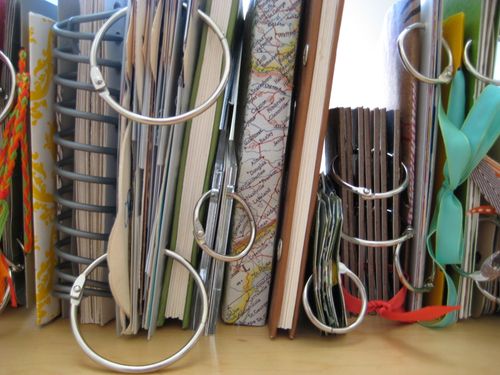 I primarily bind books with book rings. You can buy book rings at an office supply store in the paper clip aisle. Or through amazon.com
. I use a Crop-A-Dile
to punch holes because it will go through anything – chipboard, bookboard, fabric, you name it. It can also go through many sheets at once which saves a lot of time.
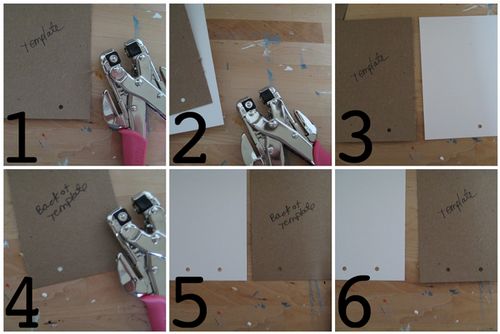 To get my holes to line up through the entire book I do the following :
- I punch one hole in a template card. The template card is cut to the same size as my book will be, which in this case is 4×6.
- Then I line up the template with a page that will go into the book.
- I punch through the template and into the book page. This makes a hole in the book page in the same spot.
- I turn the template over and line it up again with the book page and punch through again.
- This gives me two holes in my book page that are equal distance from each edge of the paper. They are "perfectly" lined up.
- To finish it off, I line the two pages once again and using my book page as a guide, punch a second hole in my template. Now I have a perfect template to use on each page.
+++
Q&A – (Feel free to skim, but I wanted to be sure to fully answer everything.)
Q: I was wondering how your mini making flows? Do you sit down and throw them together and just get it done? Is it more deliberate and detailed? I plan to make minis but get thrown off without a printer and lose inspiration before I get my photos printed. Do you have any tips for this? I notice you made this mini in advance.
A: In general, yes, I work quickly and just throw the books together. I have a lot of paper scraps. I am always saving stuff in little boxes and drawers that I know will come in handy on a book or project. I have a pretty good idea about what I have and no qualms about using stuff. My advice would be to start by cutting everything down to size. 3×5, 4×6, 5×7, whatever it is. Once the photos and paper are the right size, play with the order. What colors and patterns look best next to each other? Are you going to be journaling? Where will your journaling go? Plan it out. Then glue and punch your holes.
If you don't have a printer, it can be harder to just start working when ideas strike. I recommend getting your photos printed every month or so. Print a bunch – and get doubles of some – so when you do decide to start working you have a pile of pre-printed photos to play with.
I made the minibook for New York in advance, mostly because I wanted to try Jamaica's technique and because I know I will be sure to take more photos and grab more souvenirs if I have a good plan for where everything will be stored.
Q: My question is how you can choose such amazing paper? I always go looking for pretty paper, but I can never find any that isn't over colorful and attacked with glitter. I love the paper you use, its so simple but it still has a design.
A: Thank you! I work part-time in a paper store. One thing I like about the store is that it sells very few traditional scrapbooking supplies. Instead of heading right to the 12×12 section, I look at all sorts of other types of paper for things to incorporate into my books. Calendars, wrapping paper, greeting cards, stationary, catalogs, magazines and book pages will all work as great patterns for your books. Step away from the scrapbook papers. Look for patterns that vary: some tiny prints, some big prints. Look for floral patterns and graphic shapes. And think about what you are buying. Would you buy a dress in that pattern? Would you frame this paper and hang it on your wall? If the answer is no, you probably are not wild about it. And if you don't love it, you won't use it in a project.
Q: Do you have like an actual scrapbook that you add regular pages to? Or do you just do mini books for individual trips and events? I want to scrap book, but it's almost like I don't know where to start.. should I make a small album.. or a big one with just pages of adventures.. I'm so lost…
A: I do have a bunch of 8.5×11 scrapbooks. They are just like these but not corduroy. in these I store regular size layouts. But I don't do too many of those right now, my energy works better with little books. I say, start where you are comfortable. Do not get overwhemled with all the years of photos you have never scrapped. Instead, look at your photos – which are your favorites? Start with those pictures and do layouts or make a book using only those. I also recommend A Designer's Eye for Scrapbooking by Ali Edwards if you are just getting started. It's a good place to just get some page ideas and learn about photo+word placement.
Q: Are your current minis all 4×6 size? Where did you get that green (and also in red) checkered box paper (used in your 24 & adventure mini)? i love it ! I'm new to chipboard (as well as Hambly screen prints), how can you use it and do you typically use it? where'd u get the book binding supplies, like the tape and hard covers?
A: I tend to work with 4×6 because photos are cheap to print at that size.
That green grid paper (and red) are both large sheets from Paper Source that were on sale and are no longer available as far as I know.
Chipboard and Hambly Screenprints can both be cut on a paper cutter. Chipboard is inexpensive recycled paper that is thicker than normal cardstock. It works well as a thick cover to a small album. Do not confuse chipboard with bookboard. Bookboard is much thicker and what I use to bind custom journals. It cannot be cut with a paper cutter and is a very sturdy material. Hambly Screenprints are one of my favorite products. I love the graphic designs + simple colors. They are transparent and heavier than normal paper. Here is a book where I featured screenprints prominently.
Right now the best in stock selection of bookbinding materials that I have found is at Paper Studio. They have a video that shows how to do case binding as well.
Q: I would LOVE to spend some time creating these little mini books, but I keep banging my head against this problem – I don't necessarily ever have pictures the right size to fit in the frames, or that work on a page, or whatever. I guess, as you mentioned, I could take 4 or 5 shots and plan them, but I never have that kind of time. Perhaps just 1 and hope for the best? I'd love to create something like this for our anniversary cruise (we leave on the 19th) – something special just for "us," separate from our vacation scrapbook, you know? Any suggestions? Advice?
A: I take a lot of photos. Oodles. Mostly of stuff. Like water. Or grass. Or a boat. I don't take many "scenery" photos because they are not too interesting to me. I could just buy a postcard. The good thing about "stuff" photos is that you can crop them down to whatever size you want. You do not have to worry about cutting out Aunt Sue or the dog. I also tend to frame my photos in the viewfinder so they either fill the screen completely or do not take up too much space. That way you have a lot of flexibility with the cropping later on.
As for planning shots, I don't really do that often. I am just careful to look at the photo (thank you, digital) after it's taken and be sure it was what I wanted. If it's not, I retake it. It takes more time but I end up with shots that I love instead of ones that I wish I had set up better.
Consider doing a little album on your cruise. You don't want it too take too much time away from actually enjoying the cruise, but if you take 10 minutes in the afternoon to write down what you did, what you ate, what you saw you can capture those memories before they leave you and later you can add your travel photos. AND TAKE A LOT OF PHOTOS. Go for 100 a day.
Q: How do you finish a whole mini book!? lol I have about 6 mini's at home that I have made the book for, decorated the cover, and made the first page or two… then it gets thrown in a bin and never touched again.
A: Consider making a book that you can finish in one sitting. A book about one day. Or about your favorite things. If you take a trip, that trip ended so the book should have a clear ending too. Be sure you have all your supplies and photos on hand and just try to power through. It is difficult to come back to half completed projects. I have some books that I will probably never "finish" adding to, like this one. But most of mine are "make them and be done" books. I purposely choose topics that I can wrap up quickly.
+++
AND ONE FINAL NOTE:
Last week, while copying photos onto my external harddrive I messed up and deleted EVERY SINGLE PHOTO from 2007 and 2008. I was upset – like sick to my stomach, upset – for about 30 minutes. And then I got over it. They're gone. But the point of what I do, make books, make layouts, blog is to get the photos out of my iPhoto and into some context. To me, 300 photos paired with words and thoughts is worth more than 3000 photos in storage. That's not to say I will routinely delete my photos, but I will continue to be ACTIVE with my pictures and get them printed frequently. And if I can get them all into books, even better.
HEY! If you made it this far : leave a comment with your favorite COLOR combination and I will pick a random winner and send you an envelope full of pretty paper. Currently my favorite pairing is orange + gray. Or yellow + green. GIVEAWAY CLOSED – THANK YOU!

Leave a reply to Megan Anderson Cancel reply